Coming soon!
Separating the Dev from the Ops with VSTS, Docker and Azure Container Service (part 2)
Part 2: the Ops workflow

In part 1 of this guide, we set up a CI pipeline for an ASP.NET Core web API, resulting in Docker images being pushed to an Azure Container Registry.
These images contain everything they need to run, isolated, in a container.
Because we tagged our images in the repository with a BuildId, they can be considered immutable. Once it is pushed to a repository and given a unique tag, the image will never change — this makes them perfect for safe, repeatable deployments, for example when deploying to multiple environments.
How we deploy these images depends on various factors, for instance, what kind of app we are deploying. Small, single-service apps or bigger, monolithic applications can be deployed to one ore more virtual machines (or even servers), while large, distributed multi-service apps (for example, a microservice-based application) introduce additional concerns and complexity that needs to be considered and dealt with.
The Docker Hierarchy
Let’s pretend that our web API is part of a distributed application, comprised of many such web API’s, and requires high availability, scalability and load-balancing.
In order to achieve these requirements, we need to tackle some concepts and terms of Docker first. So far, we have seen that a container is a single run-time instance of an image. But what if we want to run multiple instances of our image so we can e.g. load balance incoming traffic? With Docker, we can leverage services to define “how an image runs in production”. Docker services encompass a single image and everything that image needs to run smoothly — the amount of replicas, what ports it should use, node-restrictions (more in this later), and so on.
Since our application is comprised of multiple API’s, we will need to define multiple services. Multiple, interrelated services deployed together is what’s called a stack in Docker. A single stack usually comprises many services that relate together as a single application, such as a microservices-based (or any other service-oriented) application.
Analogous to the Dockerfile, Docker utilises a docker-compose.yml file to encode the various services that your stack consists of. This file is an important tool in our Ops-workflow because it is a single source of configuration for all our services. This YAML file will be the foundation of our deployment-pipeline.
Let’s go back to our ASP.NET Core API and add such a docker-compose.yml file. This file can be placed anywhere in your project, though I prefer to keep it in the src folder. Update the contents to look like this:

Let’s take a closer look:
- myapp is defined as a service, running an image that resides in our Azure Container Registry. Note the BUILD_ID: as we create this file, we don’t know what image to pull from the registry. Remember how we tagged our images with the BuildId during the CI cycle — we will add a step to this cycle to replace this BUILD_ID with the actual BuildId. The correct image to be used will be decided during deployment.
- We set the restart policy to on-failure, as soon as the myapp service crashed, it should restart.
- Finally, we instruct our service to use the myappnetwork network. This network is an overlay-network, used by all necessary services, that enables load-balancing.
Please note that we’re using version 2 of the docker-compose.yml file here. At the time of writing, the most recent docker-compose file version is 3.4. The only reason we use this outdated version, is because Azure Container Service doesn’t yet support version 2.1 or higher.
There is a workaround using a community-driven template in ACS Engine that allows running Docker in integrated swarm-mode on ACS.
Commit and push your changes to include the docker-compose.yml file in our remote repository so it can be picked up in our CI/CD pipeline.
Docker Swarm
Great, thanks to the docker-compose.yml file, we have a single file that holds configuration for all our services to make sure they are deployed correctly, scaled appropriately, etc.
Now that we know how to deploy our services, it’s time to discuss where to deploy them. Since we want our distributed application to be highly available, we should spread instances of our various services over multiple virtual machines or servers.
This is where Docker Swarm comes into play. Docker Swarm is a collection of machines (either virtual or physical) running Docker, joined in a cluster (when using Docker Swarm, clusters are referred to as swarms), that can be treated as a single, virtual host. This allows us to run docker commands (e.g. to deploy a certain service or stack) on a single machine, affecting all machines in the swarm.
Machines that are joined in a swarm are called nodes. Note that commands can only be executed on specific nodes, namely swarm managers. Other nodes are referred to as workers and simply provide capacity. Nodes deployed in a swarm participate in an ingress routing mesh — thus ensuring that a service always has the same port reserved for itself across machines.
The SSH Key
Before we can get our hands dirty and fashion a full-fledged Docker Swarm for our API, we need to tackle one last obstacle: generating an SSH key.
SSH keys provide a more secure alternative for logging into VM’s than passwords alone. While passwords, however strong, can eventually be brute-forced, SSH keys are nearly impossible to decipher.
These keys consist of two parts: a public key and a private key — both represented by a long set of characters. The public key can be placed on the VM while the private key should be stored safely (and securely, using a passphrase) on your client. After this, you can connect to the VM from the client without using a password.
When creating a Docker Swarm running on Azure Container Service, you will be asked for an SSH key (at least, the public key). This key is then installed on a swarm manager in the swarm so we can sign onto said manager node and execute docker commands — e.g. commands to deploy our stack.
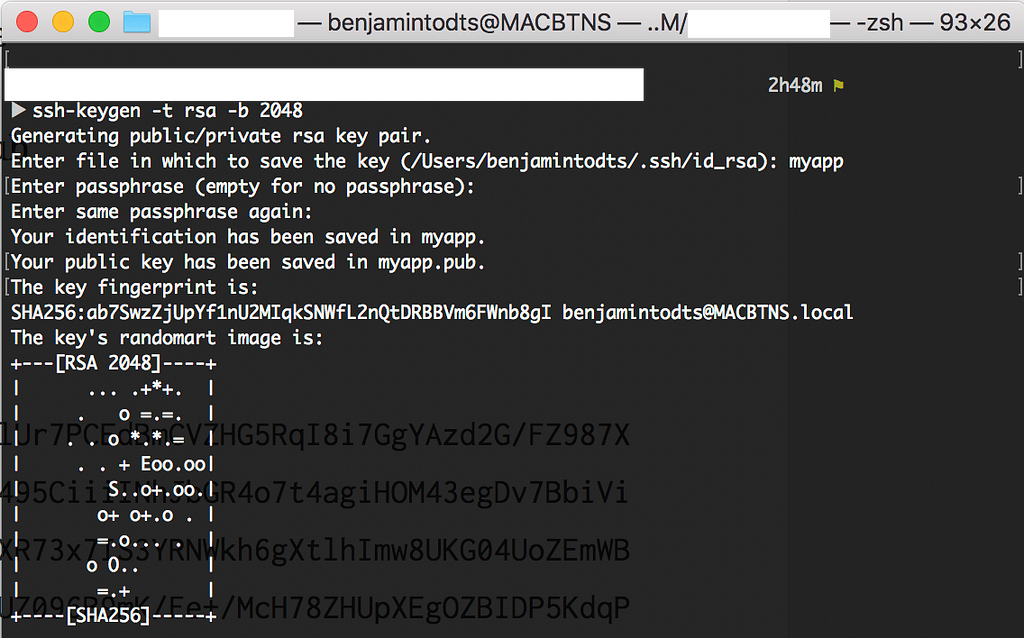
Generating a keypair on Mac or Linux is easy enough: simply open your terminal and type ssh-keygen -t rsa -b 2048. If you are using Windows, you can use PuTTYgen, as described here.
The output on a mac should look like this:
Great! That’s all we need to set up the production environment for our distributed, multiservices-based application: a Docker Swarm running on Azure Container Service.
Azure Container Service
Head back over to your Azure portal, click “New” in the top left corner and search for “Azure Container Service”. Choose this option:

Press Create and give your Azure Container Service a meaningful name on the next screen (I went with “myapp-acs”). Choose the same location as your Azure Container Registry — this reduces network latency.
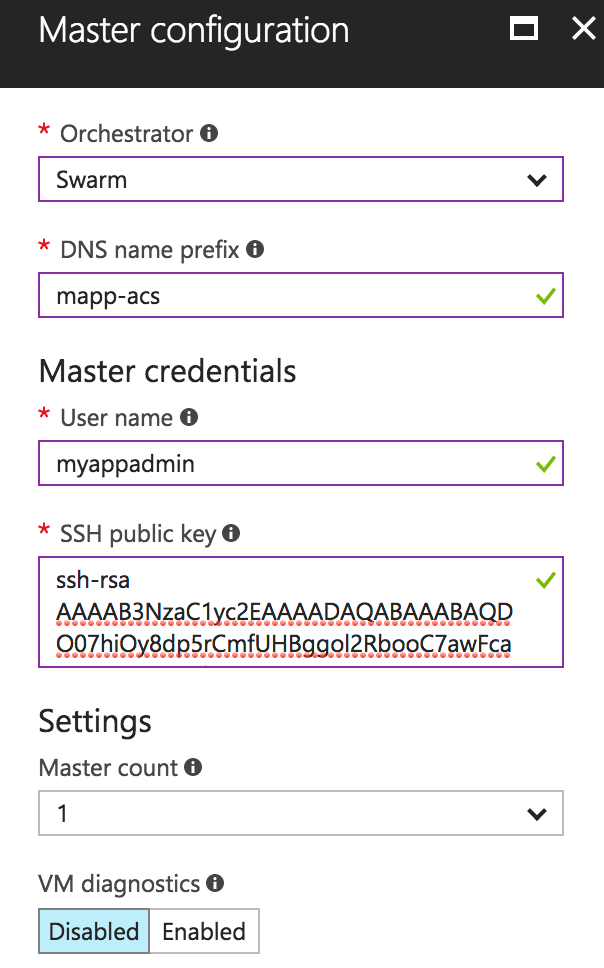
In our ACS’ Master Configuration, we get prompted to choose an Orchestrator.
Maintaining a distributed application on a cluster comprising both virtual and physical machines is demanding. Spreading images across nodes, health checks, container networking, scaling etc. are some of many concerns that such clusters imply. An Orchestrator is a tool that manages a lot of these tasks for us. In this guide, we will use Docker Swarm as our orchestrator, but note that other providers are available — e.g. Kubernetes by Google, Azure Service Fabric or Mesosphere DC/OS.
Note the SSH Public Key field — this is where we will paste the public key of the SSH Key pair we created earlier. To get the public key, we can use the cat command, like so:

The Master count indicates the number of swarm managers for our cluster; 1 master will suffice for our app.
Finally, the master configuration looks like this:
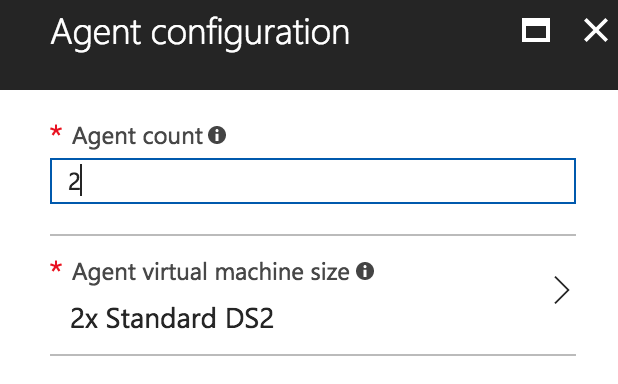
Next up is the Agent configuration. This is where we can configure the worker nodes in our swarm. Let’s choose 2 agents of type Standard DS2.
As soon as our swarm is running, our service will be distributed across both these machines.
Finish the installer and wait for your Azure Container Service to be deployed (this can take up to 20 minutes).
SSH Service Endpoint
While we wait for our Azure Container Service to be deployed, let’s add a new Service Endpoint to our VSTS Team Project. During deployment, we will need a connection to the swarm manager in our swarm — we can configure an SSH Service Endpoint that will contain our private SSH key to connect from VSTS to our swarm and execute commands on the manager during deployment.
Head back to VSTS and go to your Team Project’s Settings (using the cog icon) and choose the Services tab. Add a new Service Endpoint of type SSH and fill in the required fields like so:
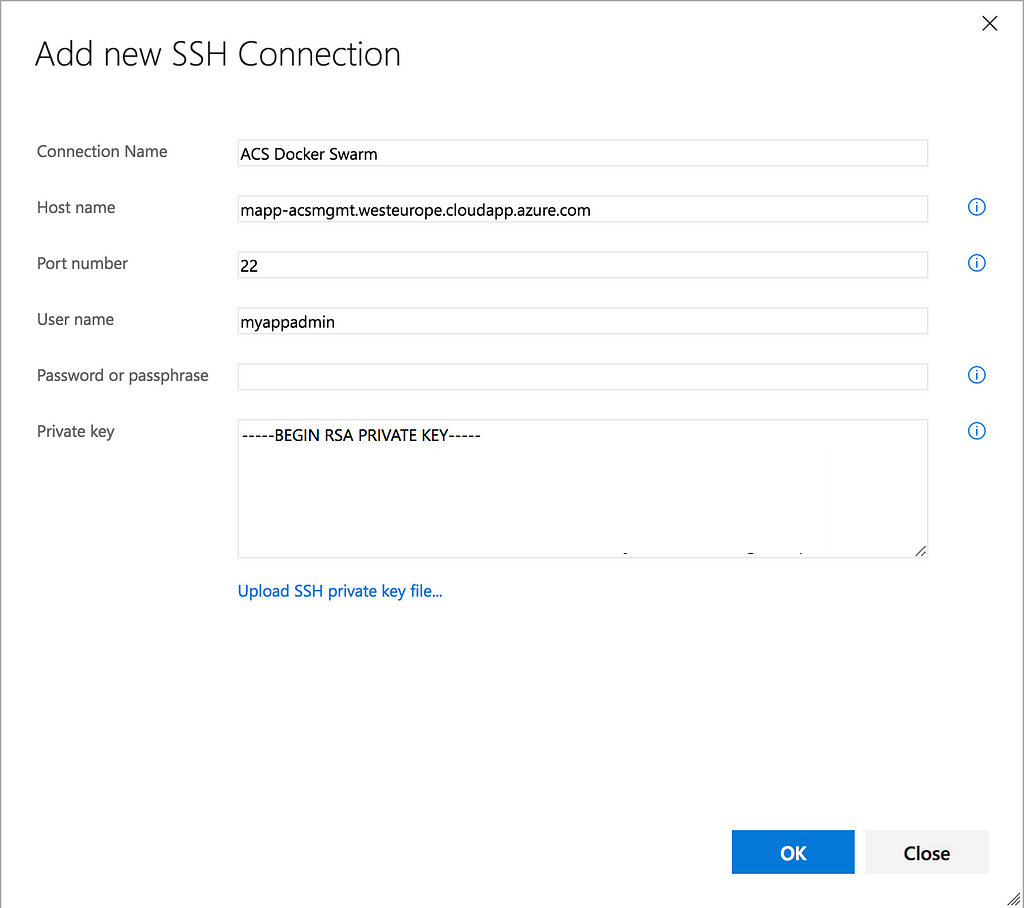
We don’t have to copy the private key value, we can simply upload a file. When we used the ssh-keygen command to create our key-pair, 2 files were created: myapp and myapp.pub. The myapp file contains our private key and can be uploaded to use in our endpoint.
Once created, this endpoint can be used in any VSTS task to connect to any virtual machine that has the public key installed. By providing the public key when we set up the Master Configuration of our Azure Container Service, it was automatically installed on the swarm manager node.
Replacing the BuildId
Great — now that we have an Azure Container Service up and running and a Service Endpoint pointing to our swarm manager, we can create a continuous deployment pipeline to our swarm. This pipeline should be triggered as soon as a continuous integration build in VSTS finishes successfully.
However, we need to know what build triggered our deployment — we need the build’s id. Remember how we used a placeholder BUILD_ID in our docker-compose.yml file? Let’s modify our build definition one last time and add a task to replace this variable with the actual build id.
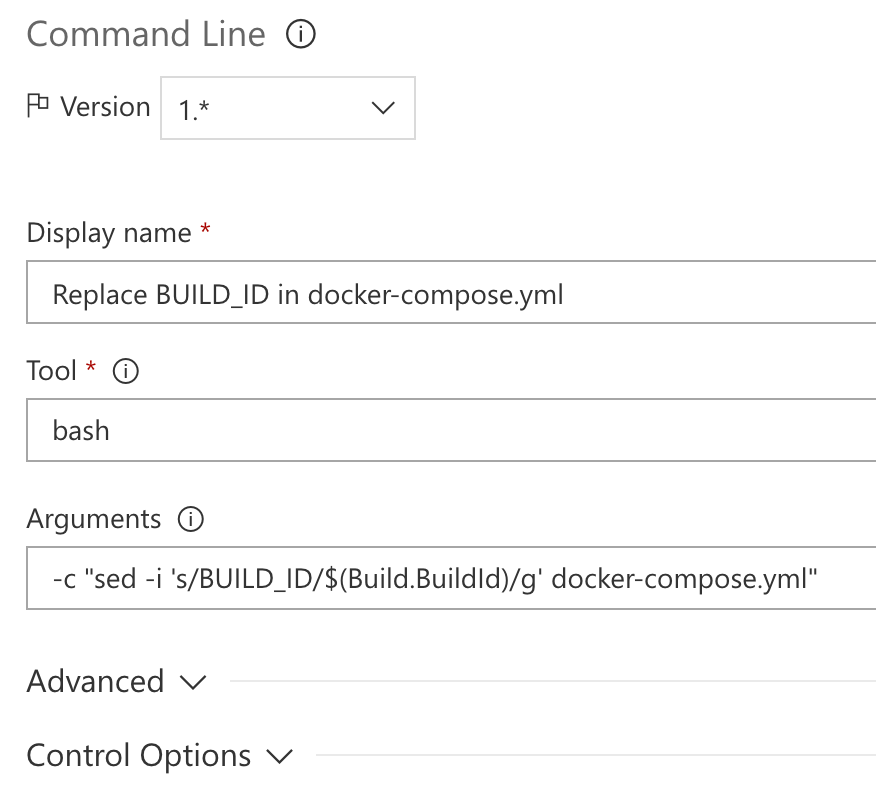
Head back to the Build & Release tab in VSTS and choose Edit for our build definition. Add a Command Line task and set the arguments to: -c "sed -i ‘s/BUILD_ID/$(Build.BuildId)/g’ docker-compose.yml”.
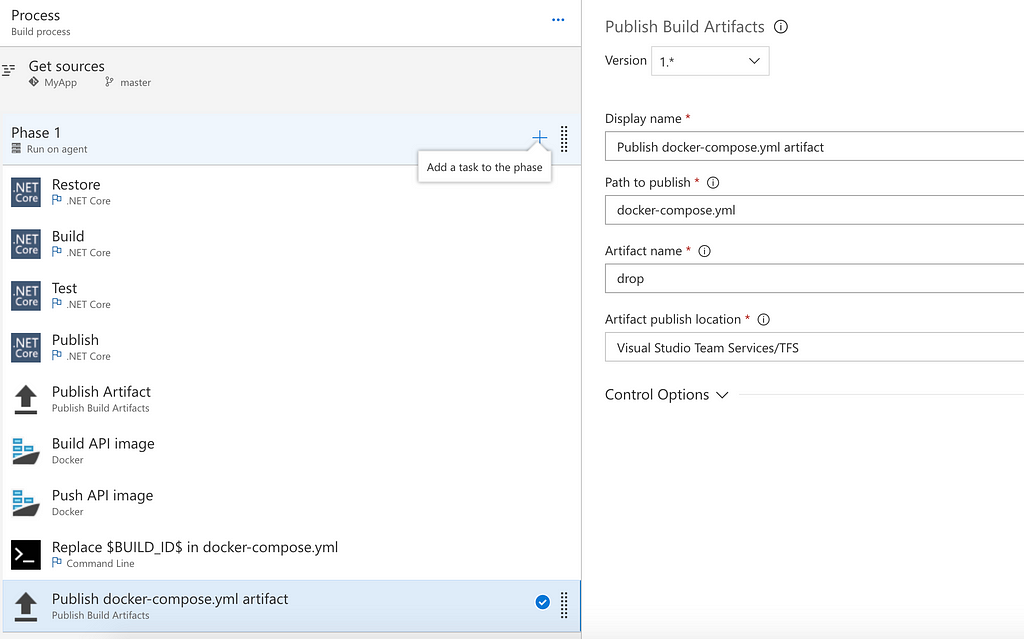
Finally, add one task to drop the updated docker-compose.yml file as a Build Artifact so it is available to our deployment cycle.
Now hit Save & Queue to save and immediately trigger a new build. Once it is finished, we will have an image in our Azure Container Registry and a docker-compose.yml file pointing to the same BuildId — all the artifacts we need in our deployment cycle.
Continuous Deployment
To automate our deployments in VSTS, we need to create a new Release Definition. In VSTS, click on the Releases tab under Build & Release and create a new definition.
First, we’ll add a new Artifact Source to get our updated docker-compose.yml file. We will also set up a trigger on this Artifact Source, which will trigger a new release whenever it gets updated — i.e. whenever our CI build finishes and produces a new docker-compose.yml file.
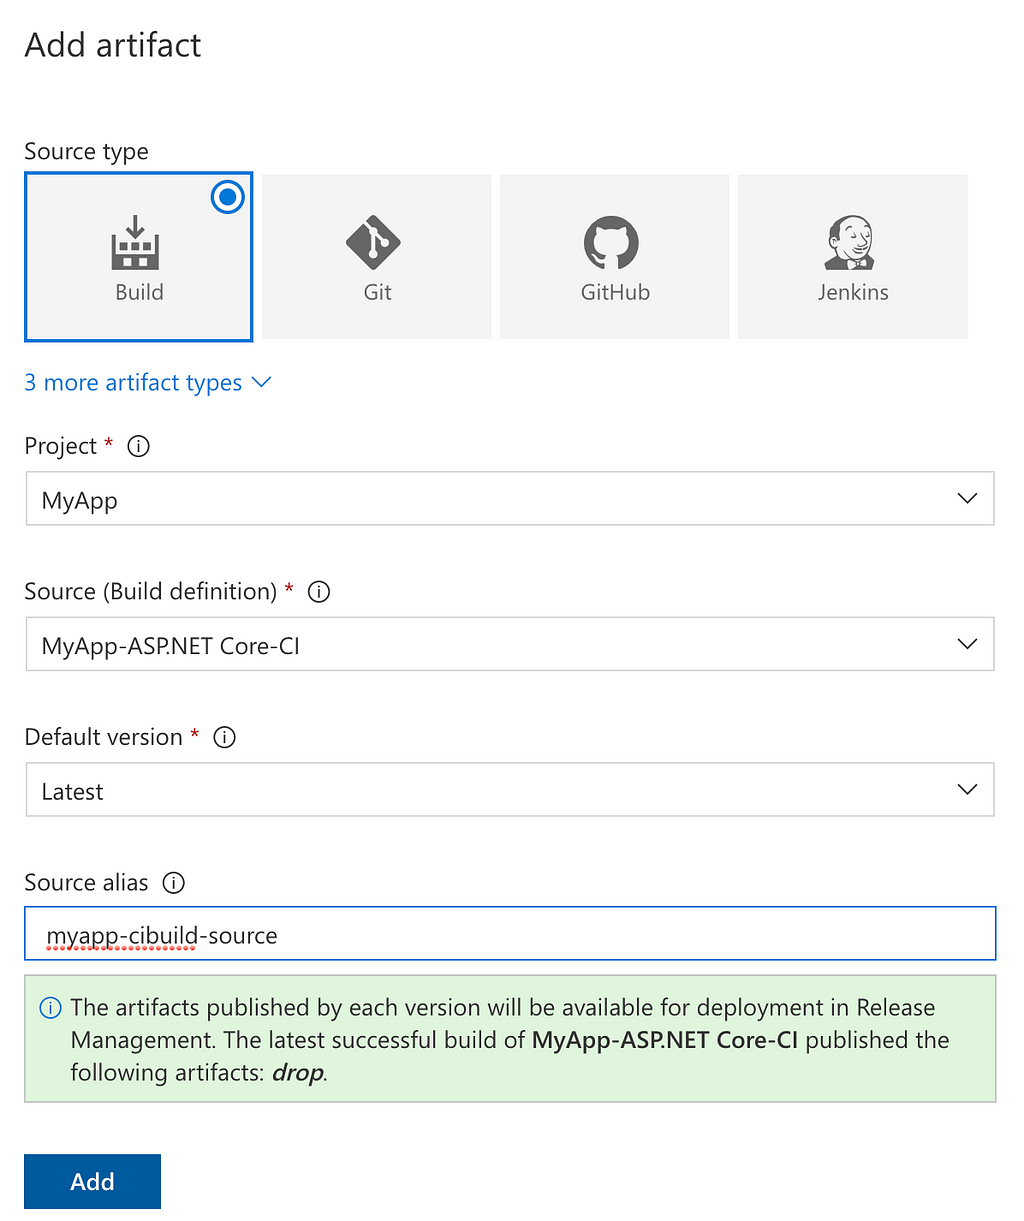
Our Artifact Source of type Build will use the output of our MyApp-ASP.NET Core-CI build and make it available using the alias myapp-cibuild-source (this value is arbitrary) to our release definition. VSTS immediately tells us that our CI build has already published an artifact called drop.
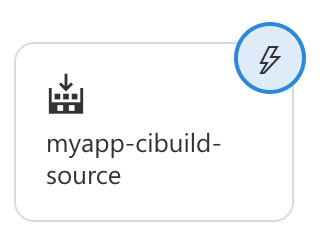
To enable to continuous deployment trigger, click on the lightning icon. Enable the trigger and choose master as the build branch. Leave the Build tag field blank — you can use this field if you want your CD to be triggered only by builds tagged with a certain keyword.
The next step is where we add an Environment. Click Add and start with an Empty process.

Name your environment accordingly (I’ve named it Production) and close the dialog. Now, navigate to your new environment’s Tasks. These tasks are the steps taken to effectively deploy our code to said environment — in our case, to deploy our images to a Docker Swarm, running in Azure.
docker-compose up
The deployment of our application to the Docker Swarm is done using the following steps:
- Copy the docker-compose.yml file produced by our build to a specific folder on our swarm manager.
- Navigate to the folder mentioned above and run the following Docker tasks:
- Login to our Azure Container Registry, pull new images, stop and remove running services, deploy new services based on new images.
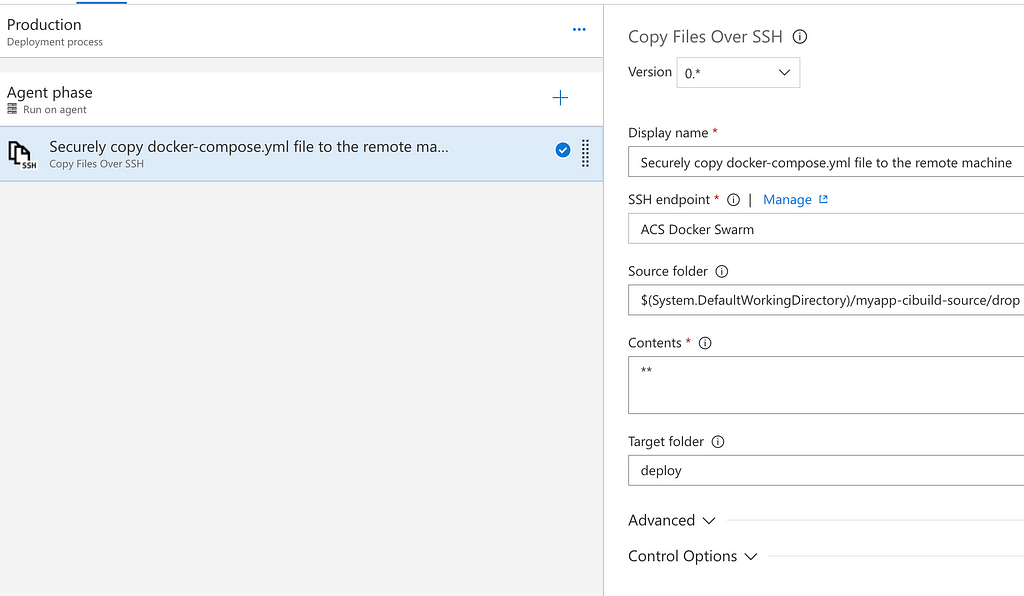
These steps are taken using Tasks defined in our environment. Navigate to your environment and add a new Task, use Copy over SSH as the template.
This task will use the SSH Endpoint we created earlier to securely connect to the swarm manager in our host and copy the drop artifact to a folder called deploy on said node. This drop artifact contains our updated docker-compose.yml.
No, add a new Task of the SSH type and configure it using the following details:
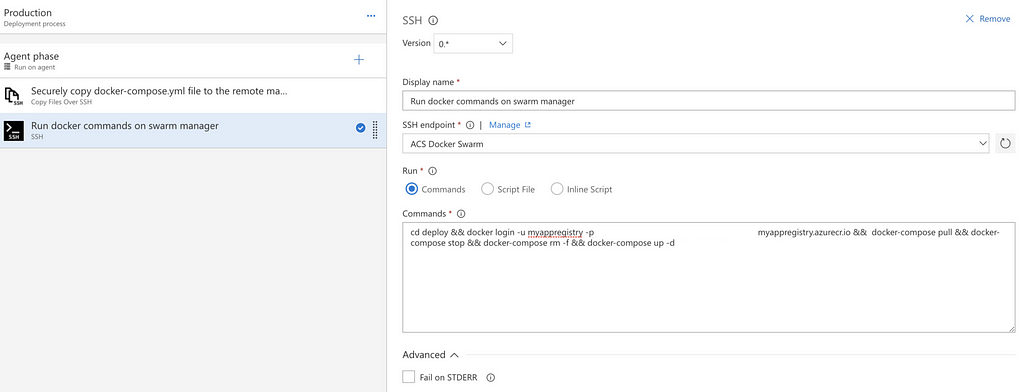
Make sure the Fail in STDERR option is disabled. Part of our deployment is stopping running services — this will print some error messages. Keeping Fail on STDERR enabled would cause our deployment to fail on this step.
The actual magic happens in the Commands field:
cd deploy && docker login -u myappregistry -p {PASSWORD} myappregistry.azurecr.io && docker-compose pull && docker-compose stop && docker-compose rm -f && docker-compose up -dLet’s break that down and look at each command in detail:
- cd deploy simply changes the current directory to deploy, which is where we placed the docker-compose.yml file.
- docker login -u … connects us to our Azure Container Registry where our images are pushed to after each successful build.
- docker-compose pull pulls the images for each service in the docker-compose.yml file.
- docker-compose stop stops the currently running services and docker-compose rm -f removes them.
- Finally, docker-compose up spins up and runs new containers based on the newly pulled images. The -d option tells docker to run the containers in the background (this is called ‘detached mode’).
There are some things to note about this approach, though. First of all, the command is rather lengthy and obscure. It is probably preferable to upload a script file to this task which is managed by Ops.
Second, using docker login with the -p option is unsafe. At the very least, you should place the password in a secure variable in VSTS.
Third, during deployment, services are stopped and removed. This causes a temporary downtime of our application. This can be easily avoided using a blue-green deployment pattern, but that is beyond the scope of this guide.
Super Awesome Release Definition
All we have left to do now is give our release definition a proper name — currently it is still named “New Release Definition”. Hover over “New Release Definition” in the top left corner and click on the pencil to change your release’s name, for example to “Super Awesome Release Definition”.

Hit Save and click on + Create Release to see our pipeline in action.

Now head over to the Releases tab where you should see a new Release based on Super Awesome Release Definition. If all goes well, it should turn green after a couple of minutes.
That’s it! To see the results, navigate to the FQDN (Fully Qualified Domain Name) or the Public IP (sometimes this is also referred to as the Frontend IP) of your Container Service’s agent loadbalancer (not the master loadbalancer) — you should see the same Values output as we did in Part 1.
Conclusion
Embracing a DevOps culture will enable and accelerate your continuous delivery cycle. It is important that both Dev and Ops work closely together yet remain independent. Dev should uphold a tight cycle, continuously improving and expanding their product, producing an artefact that is well-tested and verified.
Ops can work with this artefact and deploy it rapidly, repeatedly and safely and monitor deployments on multiple environments. With Docker containers, Dev can run and test their code locally much the same as it would run in a production environment, reducing risk and delay.
In this guide, we automatically deployed these images to our production environment, though Ops can work with these however they see fit.
Combined with tools in VSTS, we can set up both Dev and Ops’ cycle in an autonomous manner, increasing speed and repeatability — ultimately resulting in an increased productivity and improved quality of releases.
Further Reading
Docker’s get-started guide is effectively a great place to get started with Docker.
Read more about Azure Container Service here or about Azure Container Registry here.
Some great books on the subject are Containerized Docker Application Lifecycle with Microsoft Platform and Tools and the .NET Microservices: Architecture for Containerized .NET Applications ebook.

Looking for talent?
Fill in the form below and we’ll get back to you as soon as possible.
Oops. You seem to have written your full name in invisible ink. Please enter it so we can read it. Oops. You seem to have written your company in invisible ink. Please enter it so we can read it. It seems your e-mail doesn’t exist. Please enter a real one so we can contact you. Oops. You seem to have written your telephone in invisible ink. Please enter it so we can read it. Sorry, we could not send the enquiry.Please contact us at 03 294 17 41 or at info@team4talent.be