Coming soon!
Separating the Dev from the Ops with VSTS, Docker and Azure Container Service
Part 1: the Dev workflow

Agile software teams are increasingly adopting a continuous workflow. Whether it be continuous delivery, continuous deployment or whatnot, the bottomline is to get releases out quickly, reliably and — perhaps most of all — repeatedly, so said teams can iteratively improve and expand on their product.
An important part of this continuous workflow is embracing a DevOps culture; bringing development, deployment and operations closer together.
It is key, however, that both Dev and Ops are able to work independently of each other — focussing on their core responsibility.
The Dev workflow should focus on delivering new packages repeatedly and continuously, ultimately resulting in some artifact that can be utilised by Ops.
Ops, on the other hand, must be able to deploy said artifacts quickly and repeatedly, on any environment, scale up or down, etc, without depending on the developers.
In the following guide, we will create a simple ASP.NET Core Web API and set up a CI/CD pipeline in VSTS, ultimately deploying our API to a Docker Swarm hosted in Azure Container Services.
Part 1 will focus on the workflow used by Dev while part 2 will focus on the Ops flow.
Continuous integration
As soon as a developer finishes a piece of work, it should be integrated in the existing code repository and tested so any errors are detected early on. Finally, a package should be created that can be deployed to any environment by Ops.
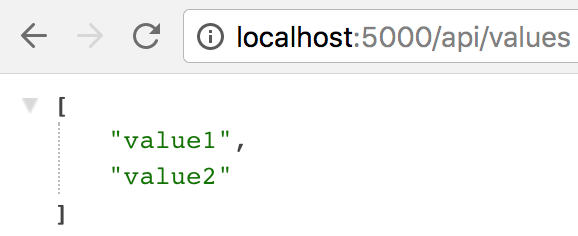
Let’s create our application. Open your preferred terminal and create a new folder using md myapp, now navigate to your new folder with cd myapp. To create a new ASP.NET Core Web API, we can use the dotnet cli in our terminal: dotnet new webapi --auth None
The application that is created for us is simple enough: it exposes a single endpoint ‘values’ that returns an array of strings:
Make sure to add at least one file in the wwwroot folder of your project (e.g. an empty Style.css file)— in a later stage, part of an automated build of our code will contain a dotnet publish task. This task identifies web projects by the presence of either a web.config file or a wwwroot folder — if this folder is empty, it will not be included and the dotnet publish task will do nothing.
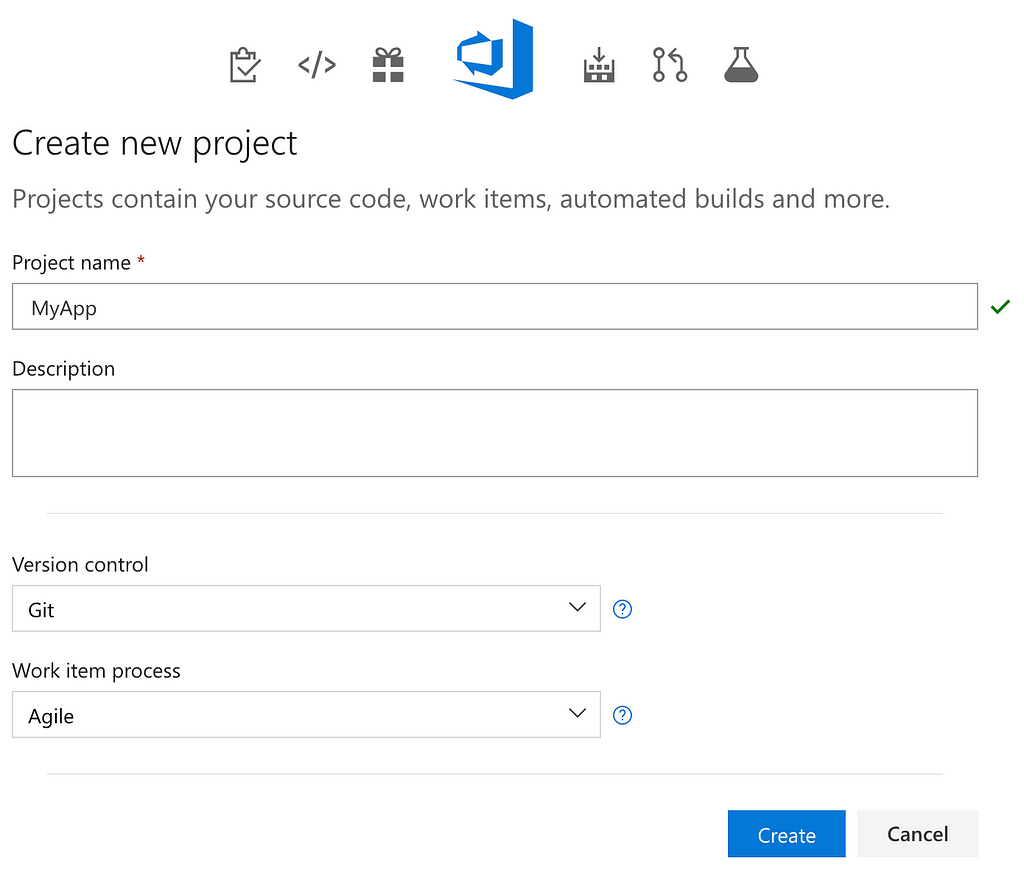
Next, let’s create a new project in Visual Studio Team Services where we will host our code.
Before we push our api to our new Team Project, let’s first set up a new Build in our project. This Build will compile and test our repository every time new commits are pushed to our Team Project.
Click on Build and Release in the menubar, then click on New Definition. Choose ASP.NET Core as the build template. In the following step, choose Hosted Linux Preview as the agent queue:
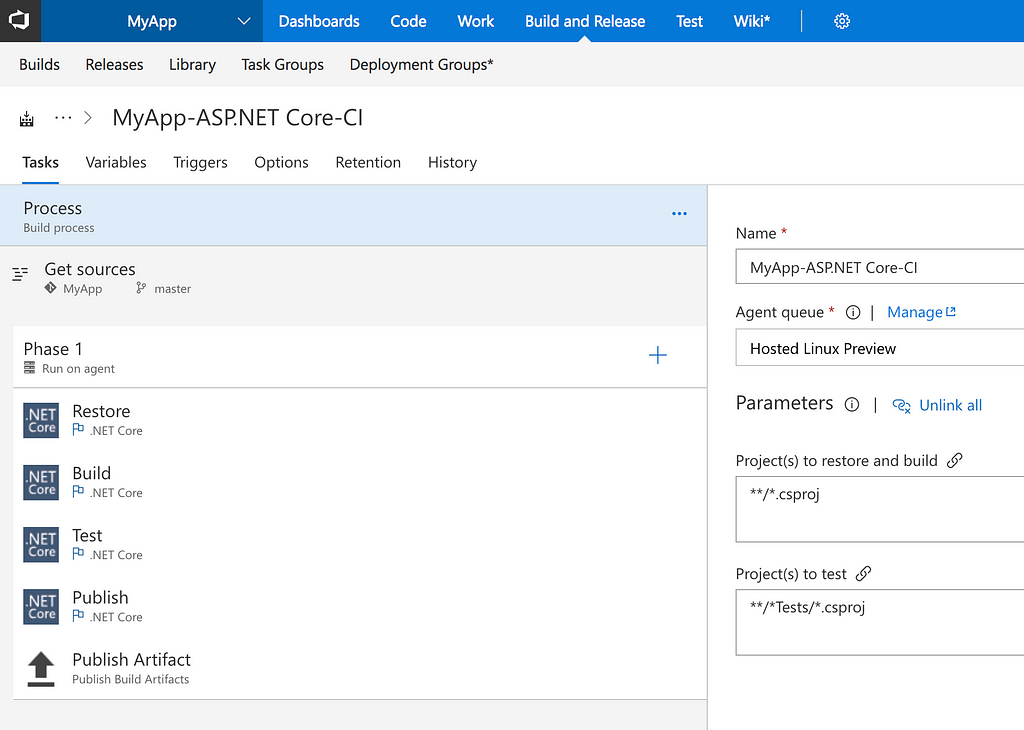
In the Publish task, disable the Zip Published Projects option and set the Arguments to --configuration $(BuildConfiguration) --output out. This ensures that the output of the dotnet publish command is dropped in a folder named out. You’ll also have to update the Publish Artifact task and set it’s Path to publish option to out.
Using out here instead of the build.artifactstagingdirectory variable makes it easier to work with Dockerfiles, which we will see later in this guide.

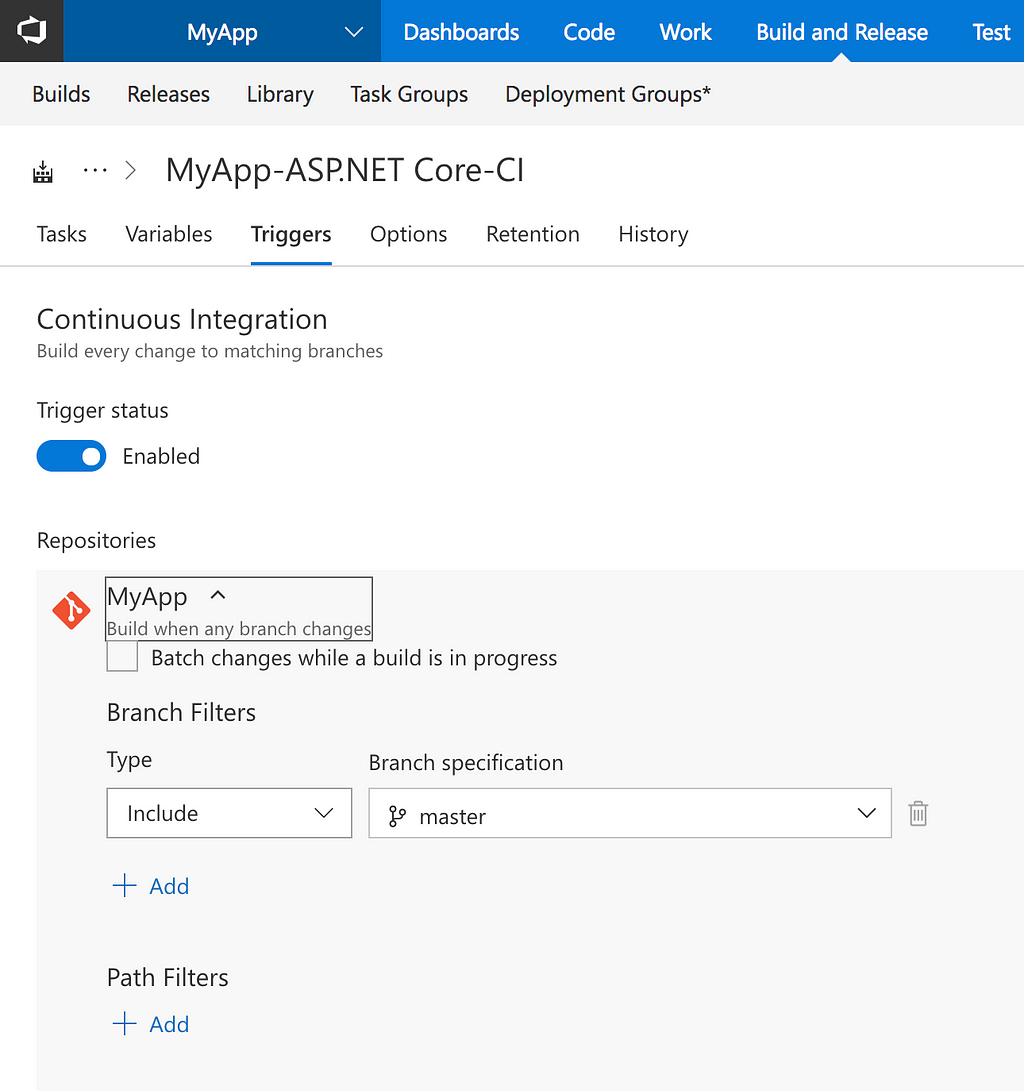
Now let’s enable continuous integration by going to the Triggers tab and enable the continuous integration trigger. This will make sure that a new build is triggered each time code is pushed to the repository.
Hit Save and our definition is done. Now let’s add some code to our project.
Open your terminal again and make sure you are in the root folder of your project. Initialise a new git repository using git init . .
Go to the Code tab in VSTS and copy the URL you see there:
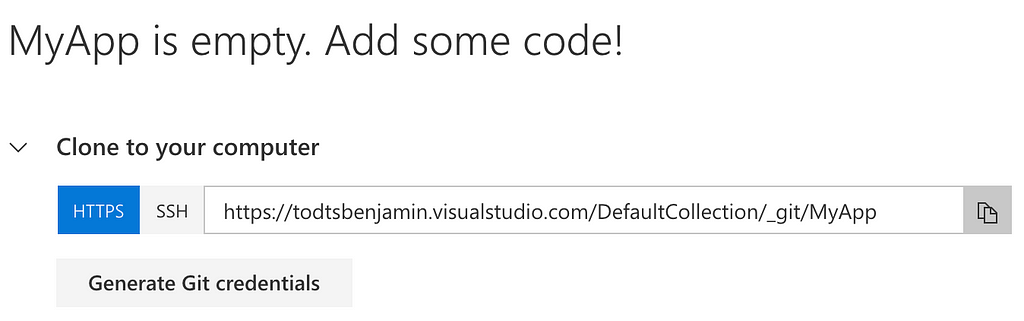
Now add VSTS as a remote using git remote add origin
If you head over to the Build and Release tab, you will see that a new build was triggered based on our definition.
Great! We can now continuously integrate and test our code.
Unfortunately, this still doesn’t provide Ops with some sort of artifact that can be deployed. This is where Docker comes into play.
Meet Docker
Essentially, Docker as a platform enables you to wrap your software in small containers which can be deployed to any environment. Although isolated, these containers share the host’s OS and resources so multiple containers can run on a single server or virtual machine. Inside these containers is your code, any bins/libs your code needs to run correctly, config files and even environment variables, making these containers easily portable across environments.
Containers are runtime-instances of images. These images actually define what files, configuration, environment variables etc. should be contained in the container. They are easily comparable to classes in object-oriented programming. Images are lightweight and will always produce exactly the same container when passed to the Docker daemon (basically, docker’s engine). These images can be defined using Dockerfiles.
Once our image is built, we have to share it with Ops so it can be deployed. To do this, we can use a repository. This works much the same as VSTS being a repository for our code: anyone with access to your repository can push new images or pull existing images and use them to spin up a container. These repositories are hosted in registries. Popular registries are e.g. Docker Hub or Azure Container Registry. Note that while repositories on Docker Hub are public, you can also host your own registry on premise if you don’t want your images to be publicly available. Repositories in Azure Container Registry are also private.
Azure Container Registry
We will use Azure Container Registry (ACR) in this guide because we will also host our application in Azure — keeping our registry in the same data center as our deployments reduces network latency and possibly avoids additional charges.
To set up a new registry in Azure, go to your Azure portal and click the New button. Search for Azure Container Registry. Select the option published by Microsoft. Create a new registry and name it e.g. myappregistry.

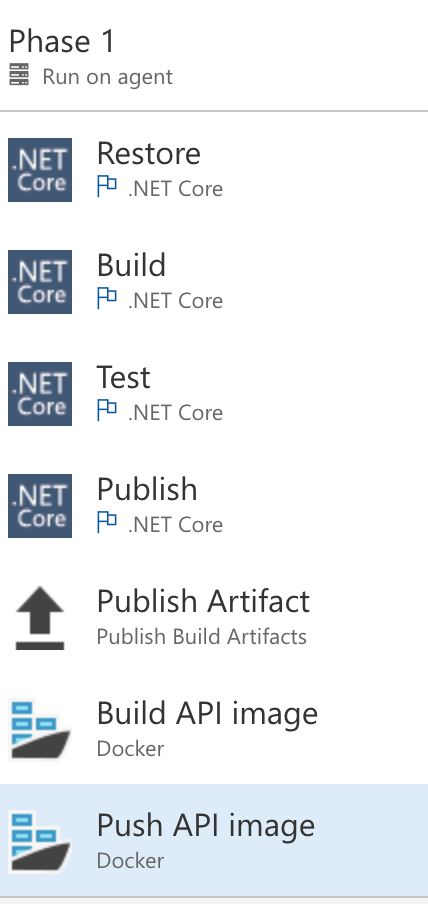
Now that we have a place to store our images, it’s time to actually create one. Because we want our workflow to be continuous, images should be created whenever a CI build successfully finishes. Let’s go back to VSTS and head over to the Build Definition we created earlier. Click Edit and and add a new task to Phase 1 (click on the big + icon next to Phase 1).

Search for ‘Docker’ and add the Docker task to your definition.
In this task, we will build an image for the code that was just published by the Publish task, based on a Dockerfile.
Configure the Docker task to look like this:
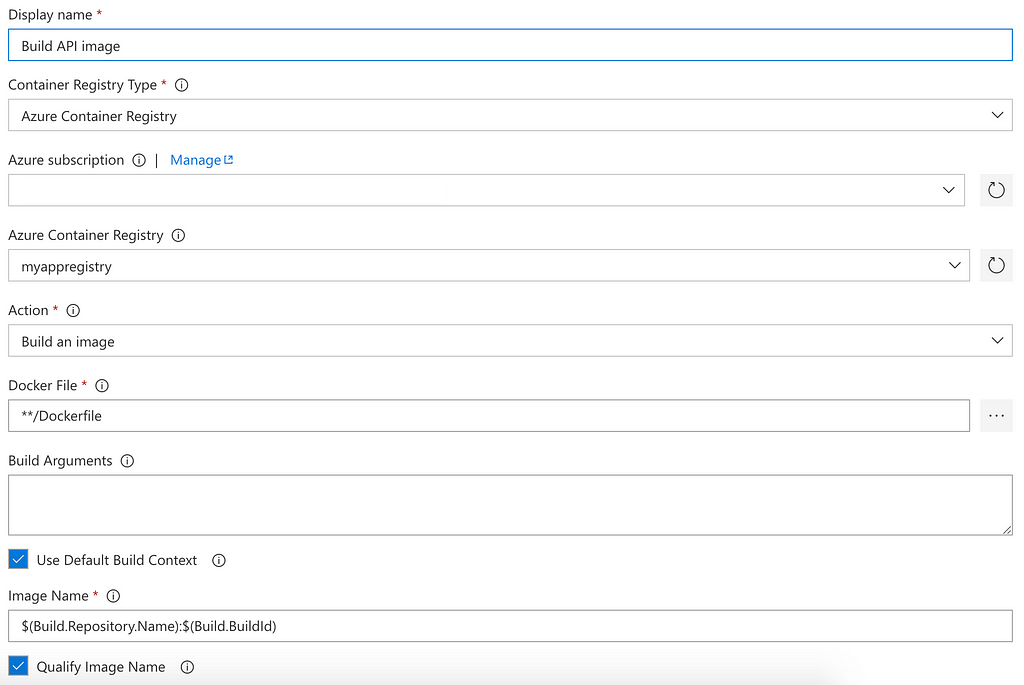
Some things to note:
- Choose Azure Container Registry as Container Registry Type.
- Link this step with the Azure Subscription that you used to create the ACR above. In the following form field, select said ACR.
- Make sure the action is Build an image.
- When you select Qualify Image Name, the image name will be {acr-name}.azurecr.io/{VSTS repository}:{buildId}. In our case, it would be myappregistry.azurecr.io/myapp:{buildId}. The {buildId} is the tag. Using this tag, we can drop (and pull) different versions of our image in the same repository in our registry. For each finished build, a new image will be added to the registry, tagged with an incremented number.
Add another task, based on the same Docker task template. Use the same settings as the previous task, except for the Action. Set this to Push an image.
This task will push the image created in the previous task to our Azure Container Registry.
Our updated Build Definition looks like this:
Now, every time code is pushed to our repository, it is integrated and tested. Upon success, a new image is created and pushed to our Azure Container Registry.
The Dockerfile
When I spoke of images earlier, I said they were defined using a Dockerfile. Currently, our build process would fail on the Build API image task because we don’t yet have such a Dockerfile, so it is impossible for Docker to know how to build our image.
Add a new file to the root of your project and call it, simply, ‘Dockerfile’.
Update the contents to look like this:
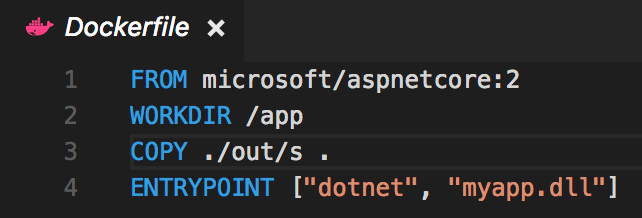
Let’s consider each of these 4 lines carefully:
- FROM allows you to specify a base image for your image. In this case, I’m basing my image on the aspnetcore image, tagged with 2 (indicating .net core 2.0), in the microsoft repository hosted on Docker Hub. This allows my container to run ASP.NET Core apps.
- I set my container’s working directory to app with the WORKDIR keyword.
- Next, all the files in the out folder are copied to the current working directory of my container. This out folder is where we specified our Build Definition to drop the results of dotnet publish.
Note the /s folder after ./out, this is necessary because the Publish step of our Build drops files in an /s folder inside the folder we specified with the --out argument. You could simply add a temporary placeholder in the Dockerfile and add a step to your build definition to replace said placeholder with e.g. the value of build.artifactstagingdirectory, for example with a bash script. For the sake of brevity, this is omitted in this guide. - Lastly, the ENTRYPOINT line tells Docker to run our app as a .NET Core application.
Now push your changes to VSTS using git. When the CI Build reaches the Build API Image step, it will build an image based on our newly-created Dockerfile and push it to our Azure Container Registry in the Push API Image task.
Using the Docker CLI, we can test our image:
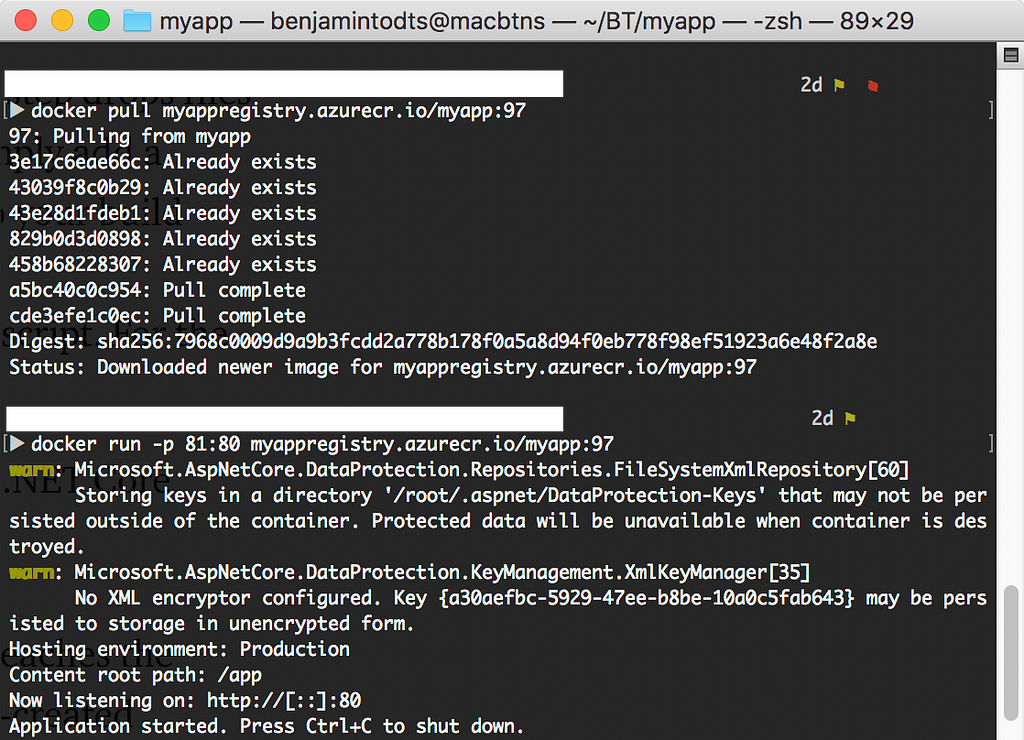
Because these images contain everything they need to run our API, we can run a container based on this image on any machine that has the Docker daemon installed.
This is as far as the Dev-side of this guide goes. We now have a CI-pipeline that automatically produces Docker images whenever code is pushed to the repository. These images are stored in our Azure Container Registry, ready to be deployed by Ops.
We will cover the deployment of our images in Part 2.

Looking for talent?
Fill in the form below and we’ll get back to you as soon as possible.
Oops. You seem to have written your full name in invisible ink. Please enter it so we can read it. Oops. You seem to have written your company in invisible ink. Please enter it so we can read it. It seems your e-mail doesn’t exist. Please enter a real one so we can contact you. Oops. You seem to have written your telephone in invisible ink. Please enter it so we can read it. Sorry, we could not send the enquiry.Please contact us at 03 294 17 41 or at info@team4talent.be